Posts

Showing posts from 2011

Large Marge

Image
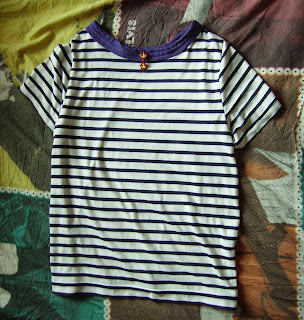
I picked up this Joy Division t-shirt from my local Primarché, I knew they had them in from a previous visit and schlepped desperately through every rail in the men's section until I found the last one - a size XL and £3! Stoooooked. Here are the before shots; huge and I mean HUGE Aaaand the after shots: So much better! I intended it to be a dress but it's really turned out more like a tunic, so I may add a panel to the bottom if I ever take it off for long enough to do so... nah. I am currently into resizing all my shirts with this 'grown-on' sleeve effect which works particularly well with L / XL shirts but can also be done with smaller sizes. I think it looks cute but it's basically just because I'm really lazy and impatient and like projects that only take 45 minutes (including posing time). I made this with the power of Larry David's stare

Twit

Should you be so inclined you can now follow me on Twitter @AppletiniTiny. I quite often post random craft projects on there and am currently using it as a kind of lack-of-mix-tape-making-resources-frustration outlet. I will blather about clothes, music, oddities of note and all thngs AppletiniTiny mostly. So it'll probably be really boring.

Updateathonatron

Update in point form! Since I started doing all these crazy craft fair / jumble sale type thingys people keep asking me for business cards, so against my better judgement (and even though I don't consider myself a business by anyone's standards) I have ordered some! I have taken everything out of my Folksy shop temporarily while I rethink / restock / brainstorm. Just in time for Christmas because I am a crazy kid like that. I have heaps of new ideas but a lot less time and am therefore 'employing' (dragging to my depths) new 'staff' (my sister) to help me create more 'stock' (junk to sell)! I have been listening to lots of 60's garage. fin

AppletiniTiny: Voted Officially 'fab' by Bloggers

If you should be so inclined you can click here  on this rad blog  Make it, Save it, Mend it  and see a lil picture of me (and my sister) at our stall on Sunday! And a couple of words about how great I am [insert pretentious laugh]! Hey don't laugh, that's my concentrating face y'all! Thanks to the lovely / very cool @knitting_nellie for her kind words!

Wee Tini Tiny Update

The jumble yesterday was brillig! I sold quite a few things but more importantly met wicked cool people and found out about some vintage fairs coming up! Mmm... clothes! I'm planning to return next month, hopefully with more stock. That's the plan. I am fermenting ideas in the brewery of my mind.

Super Gigantoid Megatron Update

Image
I moved cities, it was bonkers. But enough about me! Let's talk about my craft! What have I been doing all this time?! Firstly I took part in the Second 50-50 Affordable Art Show run by Kooki Two Bit . I was unable to attend (due to moving priorities) and didn't sell anything but was still stoked to be a part of it! Secondly I made some Things for my stall: Various hairslides and bits of jewellery (including sweater guards!) Dr. Seuss Green Eggs and Hamdbags! I will [hopefully] be selling these and much more at Rumble in the Jumble (Sixty Million Postcards), Bournemouth, TOMORROW! Anything leftover will more than likely be added to my Folksy shop . I'll also have handmade cards, more hairslides and badges! And that's (some of) what I've been doing!

How To Make Vegetarian Chicken Pie The Sarah Way

A little recipe I came up with on Sunday night, just for you. Written in my own unique style... but I promise it really is a totally rad, delicious pie! Serves 3-4 (5 at a push) Ingredients: 7ish bigish potatoes 1 package of vegetarian chicken pieces (if you want to use real chicken then that's cool with me but you'll have to figure out how to cook it all by yourself) 1 large package of asparagus (sub other veg if you don’t like it) 1 bottle of decent white wine (chilled) 3 tbsp double cream 1 egg yolk ½ pint vegetable stock Butter Bit o’ flour Milk Salt and pepper (to taste) Bit o’ Olive Oil Optional cheese (any type, all cheese is good cheese) Method: ♪    Open the wine. Pour yourself a large glass. Drink some. ♪    Boil some water in your kettle or in a pan (whichever you find most efficient). Wash and peel the potatoes. Take them with your hands and cut them up into quarters. Put the potatoes into the pan with some salt and the boiled water. Boil the

Pillows Of Destiny

Image
My friend Sally just landed herself her dream job as a librarian! Then it was her 25th birthday and next month she's moving home, so I decided to try and make her a combined gift for all of the awesome things that are about to happen to her! This is what I came up with - embroidered pillowcases! Had I had as much time as I would have liked I probably would have added a few more books on. Anyway, I love how they turned out. I used the Sublime Stitching Sexy Librarians sheet. Sally used to have pink and green hair until she got a 'real' job so I thought it would be a nice touch for these little ladies to have the same! Details, details, details: And that's about all I have to say about that!

Don't get shirty with me!

Image
Hey you guys, I am ill. Yet still I insist on slaving away over a hot blog and a cold mug of gazpacho to bring the craft to YOU! I finished off this t-shirt on Monday after initially trying to attach some weird collar of my own invention to it some months ago. Didn't work; project was left abandoned. I hacked off the old collar and finished it off with something much simpler. The fabric is that same soft jersey I bought on sale at John  Lewis and blogged about in April . I used New Look pattern 6483 and just adapted it for stretch fabric (ignored the side slits and darts and cut off the excess from the arm holes). The result is a slightly oversized but ridiculously comfy slouchy tee. Not the most exciting thing in the world but very adaptable! For the neckline I recycled the hem of my beloved old HMV uniform and just made a wide band over the raw edges. It turned out more fun than I thought it would! The buttons are from a local independent button shop (although I'm

A Dress To Impress

Image
After all the manic embroidering I've been doing lately I decided to take a break and work on some clothing reconstruction. My first project was 'prom' style dress to cute tulip cocktail dress. This is what I did (I'm hesitant to call it a tutorial as my pictures aren't great and my description probably won't be much better), click on the pictures for more detail: I've had this somewhat boring, frumpy dress lying around for years (originally from New Look); I'd thought about getting rid of it a few times but always held back because I am crazy about the fabric. I dug it out and tried it on this weekend and found that while the full on skirt and the length just didn't float my boat, the top half fit perfectly... and thus a plan began to form! First I figured out how much I wanted to trim off the bottom (5.5") and then undid the side seams to just over half way. Next I pinned the wrong side of the skirt into the shape I wanted - an angle fro

Twihard-er next time...

Image
Hi y'all! My sister got a Kindle for her 30th birthday so I decided to make her this completely awesome but redundant bookmark that she'll never use! Why?! To remind her that real books are rad (although I have to say that after seeing her Kindle I think that that's pretty neat too)! The bookmark is Twilight themed and it's all kinda symbolic and stuff. I don't know why the lion appears to be two shades of orange in this picture because it's definitely not in real life! The doily was from the lovely Barrett House (as per), and the cross-stitch patterns were all adapted from things I found on the internet or my own design. I covered the back with white felt so that the workings don't come undone and it'll be more hardwearing. I'm chuffed with how it turned out and I hope she loves it! I made this whilst listening to Johnny Cash and watching Peep Show! (P.S. The Metamorphosis canvas I blogged about below has now been SOLD! That was pretty fas

AppletiniTiny shop update!

Image
New stuff added to the shop ! The aforementioned trinket box and this canvas: It's a quote from Franz Kafka's The Metamorphosis! I made it while I was watching E! Who doesn't love a bit of juxtaposition eh?!

AppletiniTiny shop now open!

Image
Hiyaaaaaaaaaa Just so you know... you can now buy some of my bizarre creations online! Here -----> AppletiniTiny Just putting that out there for ya! No pressure! Alright... as of today there's only one thing listed but I swear as soon as I have better quality pictures of my goodies there will be more up on there pronto! Arrrriba, arriba, ondelay! On sunday I attended my first craft fair as a stallholder - actually a stallhelper because I was running my friend Helen's stall while she taught a workshop - but she let me sell my junk too! The fair was at The Print Haus, Cardiff , here's a picture of our stall: Super kawaii! Most of the stuff is Helen's, you can buy some of it here: Kawaii Crochet or check out the 'Our Friends' page above for more links! Here's some of the items I had on sale: Embroidered covered canvasses - Nick Cave lyrics: SOLD! Edgar Allan Poe Raven canvas available in my Folksy shop!  Creepy trinket box: coming soon to

Pumpkin Pasta!

Image
OK... it's not the right season at all for all these squash recipes but I'm naughty and not really into PCV (political correctness of vegetables) and more into eating whatever I feel like. Which is everything, all the time apparently. You can sub with a different kind of squash or sweet potato if you're crazy and don't like pumpkin. Ingredients: 400g (14oz) pasta (whichever kind you like best) 85g (3oz) butter 2 crushed garlic cloves 450g (16oz) cubed pumpkin pieces 2 tsp rosemary Lemon zest (to taste) Ground nutmeg (to taste) Salt and pepper (to taste) 1. Melt the butter in a big pan and add the garlic. Stir for approximately 1 minute and then add the pumpkin , rosemary, lemon zest, salt and pepper and nutmeg. Cover it and let it sweat for 15 minutes or until the pumpkin is soft. 2. Cook the pasta. 3. Mix it all together and for an extra special touch add a witty sprig of rosemary to each serving. 4. Eat and enjoy your seriously yummy pumpkin pasta.

Frogday the Thirteenth

Image
I made this little starry eyed frog guy for my friend Rhonwen's birthday! It was tough to let him go... I used some strange green woven patterned cotton for his back with brown corduroy for his belly. All made from scraps of leftover fabric and lovingly hand sewn! Then I filled his guts in with polyester stuffing. A cheapy, quicky project with the hardest part being the darting. Boy am I making myself sound like a big time cheapskate today! Here's a not-so-great picture of his belly to get you back on my side: Awwwww! I don't know why that's cute, but it is. Unfortunately [again] I can't take too much credit for this project as I got the instructions and pattern from here ; I just simplified it very slightly. I would like to take credit for having extremely relevant bed sheets though. This froggy was born with the aid (or not) of a broken heart! Know what else aside from crafting cures a broken heart? New shoes . Oh yes. It's true.

Der ner der ner der ner der ner Catbag!

Image
I've recently hit some tough times finance-wise, so seeing as I'm such a huge fabric hoarder I've started working my way through my archive pile of fabric to avoid buying any more and to spend time crafting inside instead of spending money outside. I finally decided to make a bag from this cotton flannel fabric - a regular square tote bag seemed too boring so I knocked this up based on a shape I've seen in Matalan in the past! Not bad considering that I was sick as a dead dog with a virus that day - I even managed to line it! The fabric was from The Fabric Fairy (as always), although I think I got the last couple of yards. Turns out flannel isn't the strongest or most ideal fabric for making a bag; it's best to sew around the seams a few times for extra strength or the fabric will stretch and fray very easily. Or maybe I was just carrying too many beers in my bag that day... It also tends to bobble and grow a lint layer very quickly. Oh well, it's g

Naughty-cal!

Image
I just made this rather sweet little stripey number for myself... The blue and white jersey fabric was about £3 per metre at John Lewis in the January sales so I just made a really simple cap-sleeved top out of it (using my own pattern) and then I used a scrap of vintage jersey to trim/gather around the neckline and a spare button for decoration. Not the neatest job I've ever done; but pretty good for a few hours' work. This was my first try at using the stretch stitch on my machine too; don't ask me why I never used it before but I'm never going back to my old [incorrect] ways now! To make the pattern for my top I just traced around the neckline and other dimensions of a shirt I already liked. And the same with the sleeves - I just traced around each half of the sleeve, then taped the halves together. It's pretty easy to adjust the sleeves when you're pinning if the pattern isn't quite perfect. I pin everything together and make sure it's all as neat

I'll have a P, a D and an F please Bobbin

Image
Heeeeey you, check out these adorable embroidery floss bobbins from Wild Olive ... they are free and downloadable and printable and colourful [I've just printed them out in black and white though and can assure you that they are still mega cute]. Yes, I know you can just draw faces on the bobbins you ALREADY have... but look! Some kind soul has done it for you! There are some other cool projects and ting on the site, check the 'printables' section for more free goodies.

Black Eyes And Broken Teeth

Image
While I was trawling through old links yesterday I found this cute shirt I designed for my brother in law's (now defunct) merch company Teepot. I think I drew this around 5/6 years ago... I kinda like the beat up piratey/Duane Peters look of the cassette face, all black eyes and broken teeth. I never actually got one of the shirts for myself, although other people bought it! It's so weird (but awesome) to think that people paid money for something that I designed. Might be time to revive this little guy; maybe in embroidery form?!

Bedtime Shorts

Image
Knocked up these beauts in an hour or two, nothing special but I thought I'd post them because they're the first garment I've made from a pattern all by myself with no help from Mummy! I did use one of her 80's / 90's patterns though... they turned out kinda like ele-pants too (huuuuge) but hey - they're comfty! I couldn't be bothered messing about with elastic either so I just used ribbon in the waistband for a tie, I used a nice wide one so that I could have a big bow (I stole borrowed the idea from here ). The best part... that fabric GLOWS IN THE DARK IN ACTUAL LIFE! It's from David And Goliath but I bought it The Fabric Fairy (check the links page). And yes, those are my Elvis sheets that I sleep in when I wear them! I must have used the wrong stitch though because after a couple of months they are starting to come apart at the seams. Should have used a stretch stitch - the fabric is only slightly stretchy so I thought I might get away with i